The supply and demand zones in trading are the levels that attract the majority of buyers and sellers. This is most likely the most basic explanation you will read online.
In this essay, I will go through all of the benefits and drawbacks of using supply and demand zones. I’ll show you how to utilize them and, more crucially, genuine trading instances as viewed through my eyes.
So, what are we waiting for?.
Let’s get started!
Table of Contents
1. What is Supply and Demand
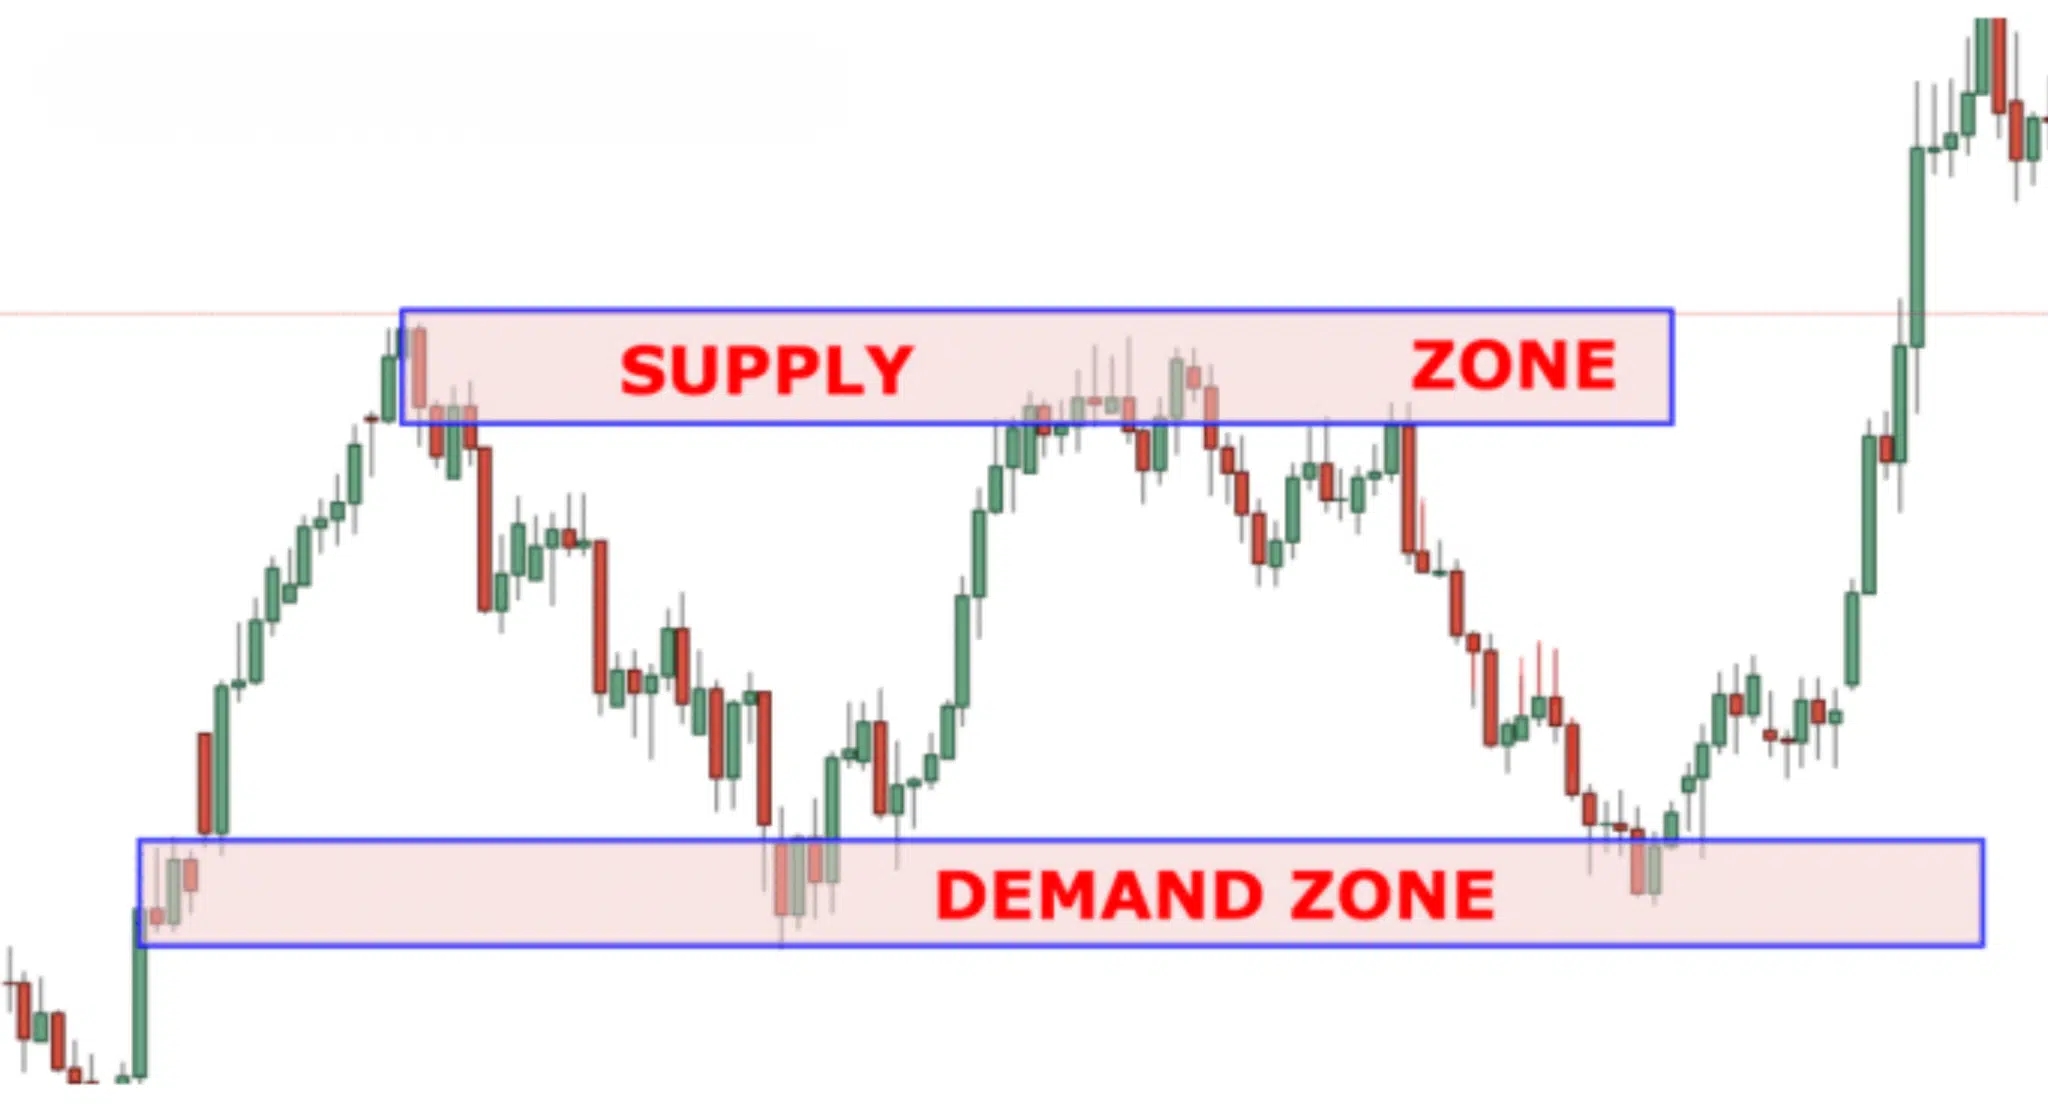
One of the fundamental trading methods is supply and demand. It focuses on the ancient rules of supply and demand, as well as how prices evolve in a free market. The premise of this technique is that the price is determined by the quantity of an instrument accessible and the demand of buyers for it.
It indicates on the chart zones where demand exceeds supply (the demand zone), pushing the price up, or zones where supply exceeds demand (the supply zone), driving the price down.
Before initiating a long or short position, most supply and demand traders wait for the price to reach these zones, where considerable buying or selling has occurred.
If you are curious about How the Supply and Demand zones form, how to spot Supply and Demand zones, you can find more interesting insight in here.
2. What time frame is best for supply and demand zone?
Because supply and demand zones are best used for day trading and swing trading, the ideal period for analyzing price movement must be intraday or daily.
However, there may not be a single ideal time range for everyone. It is determined by the trader, their trading mentality, and the periods on which they choose to trade. Backtesting what works best for a certain scenario is always necessary.
The supply and demand zones should not be employed as a trade entry strategy on their own, but rather as part of a multi-timeframe analytical approach.
The zones merely indicate places where prices are expected to invert due to increased demand or supply. It is up to the trader to devise a strategy for using the zone depending on their trading style.
3. How to use the concept of supply and demand?
Most trading principles seem wonderful in theory, but it’s only worth your time and effort to learn them if you can really use them. The terms supply, demand, and open interest may be used in three methods:
3.1 Trading in reversals

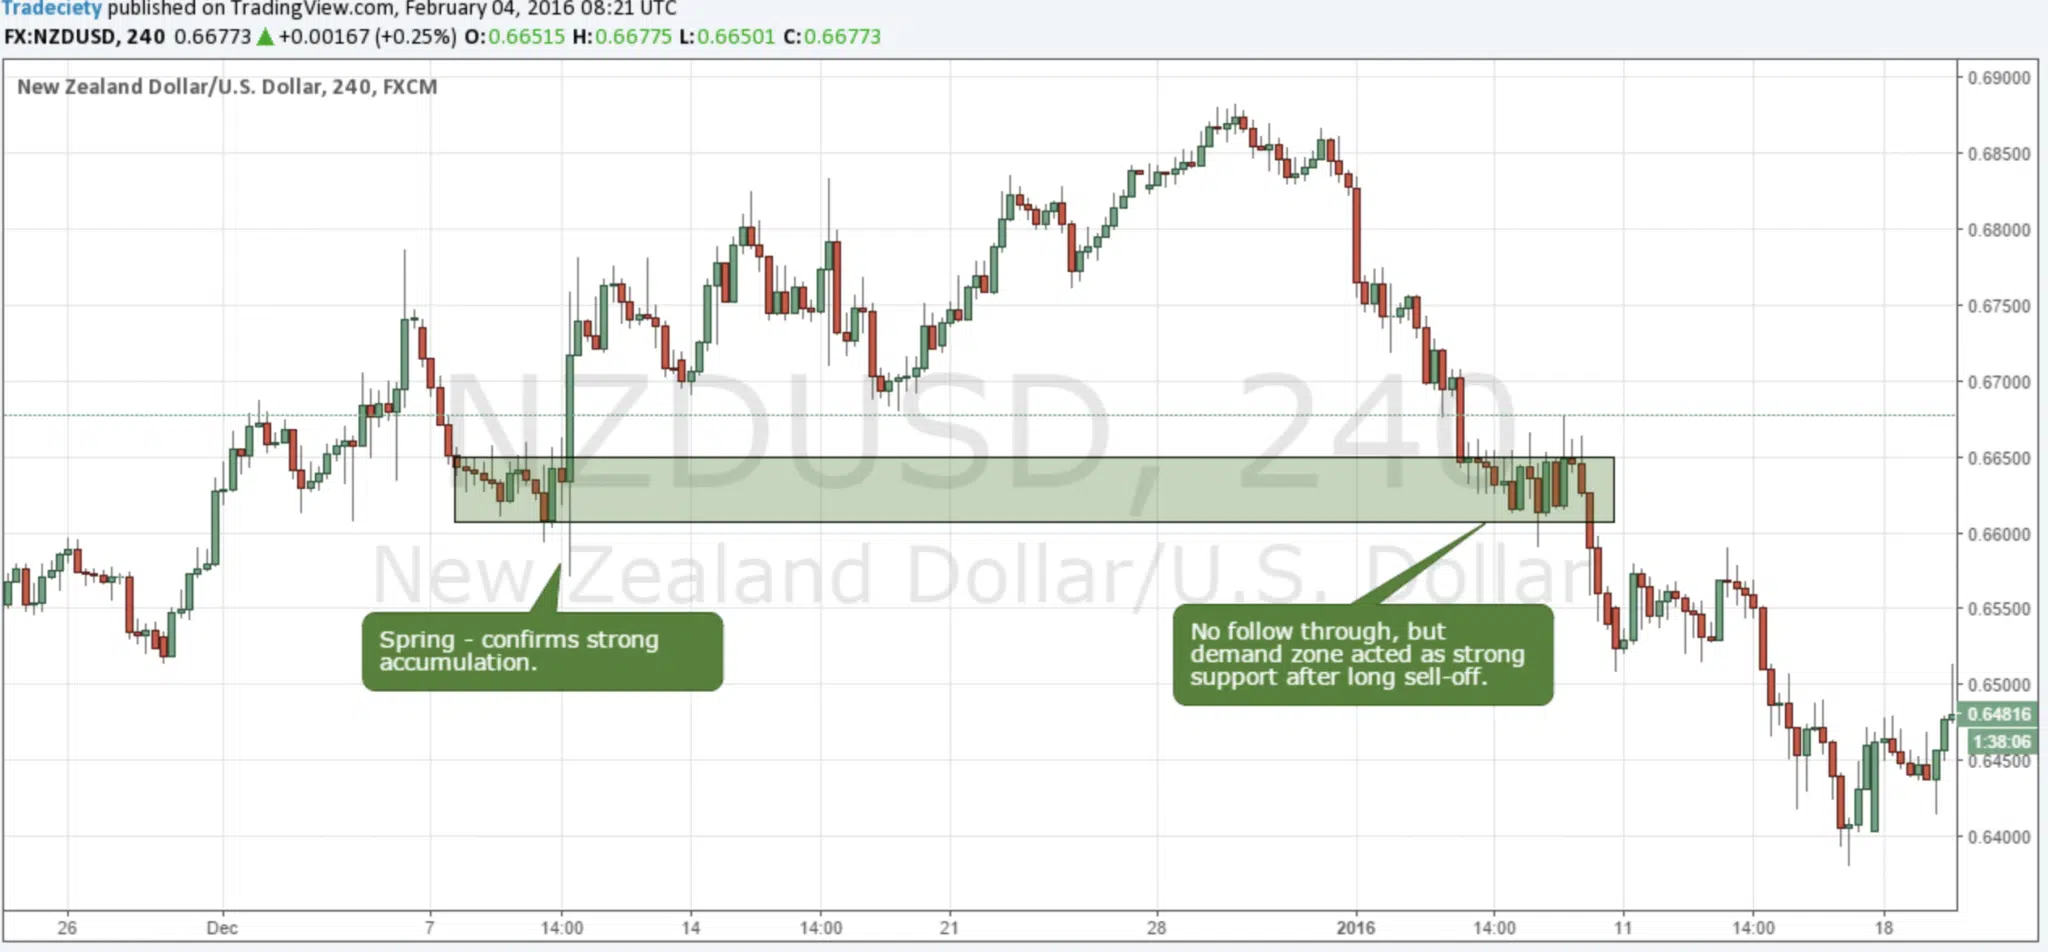
Tradeciety specializes in reversal trading, which is also the ideal way to exploit supply and demand zones. Wait for pricing to return to the region where you identified a significant prior market shift. If there is a false breakout, the chances of a successful reversal are quite high.
Combine the fake breakouts with a momentum divergence and a false spike through the Bollinger Bands to produce even higher probability trades.
3.2 Support and resistance
Supply and demand zones are natural support and resistance levels, and having them on your charts is beneficial for a variety of reasons. By combining classic support and resistance principles with supply and demand, traders may get a better understanding of price fluctuations.
Supply and demand zones are often seen slightly below/above support and resistance levels. And, while the support and resistance trader is being forced out of his trade, supply and demand traders are not.
3.3 Stop losses and take profits
When it comes to profit placement, supply and demand zones might also be useful. Place your profit goal ahead of a zone to avoid losing all of your earnings when the open interest in that zone is filled. To minimize premature stop runs and squeezes, position your order beyond the zones for stops.
4. How do you identify a strong supply and demand zone?
There are strong signals and weak signals in every kind of technical analysis or trading method. To get the finest trading outcomes, we must dismiss the weak signals and focus on the powerful ones.
The zone will display all of the following characteristics in the ideal supply and demand trading setup:
4.1 Price range is restricted
If the trading range that surpasses the breakout is too large or has too many long-wick candles, it indicates uncertainty and is less likely to signify whale accumulation.
4.2 Less than ten candles
The optimal demand or supply zone should be between 1 and 10 candles. Accumulation and distribution may take some time, but if you wait too long, the zone may get depleted before the re-test.
4.3 Significant price movement
We want to see an ‘Extended range candle,’ or ERC, in the breakout candle. This indicates a significant price movement.
4.4 New/untested
The finest zones are those where the price has not returned after the breakout. Supply and demand zones, like support and resistance, are more likely to fail the more times they are tested.
4.5 'Spring' or 'fakeout'
When the price momentarily breaks out in the other direction but rapidly reverses, this is called a reversal. This is an indication that large players have stopped seeking’ for more liquidity for accumulation or distribution.
5. Best supply and demand zone indicator in my arsenal
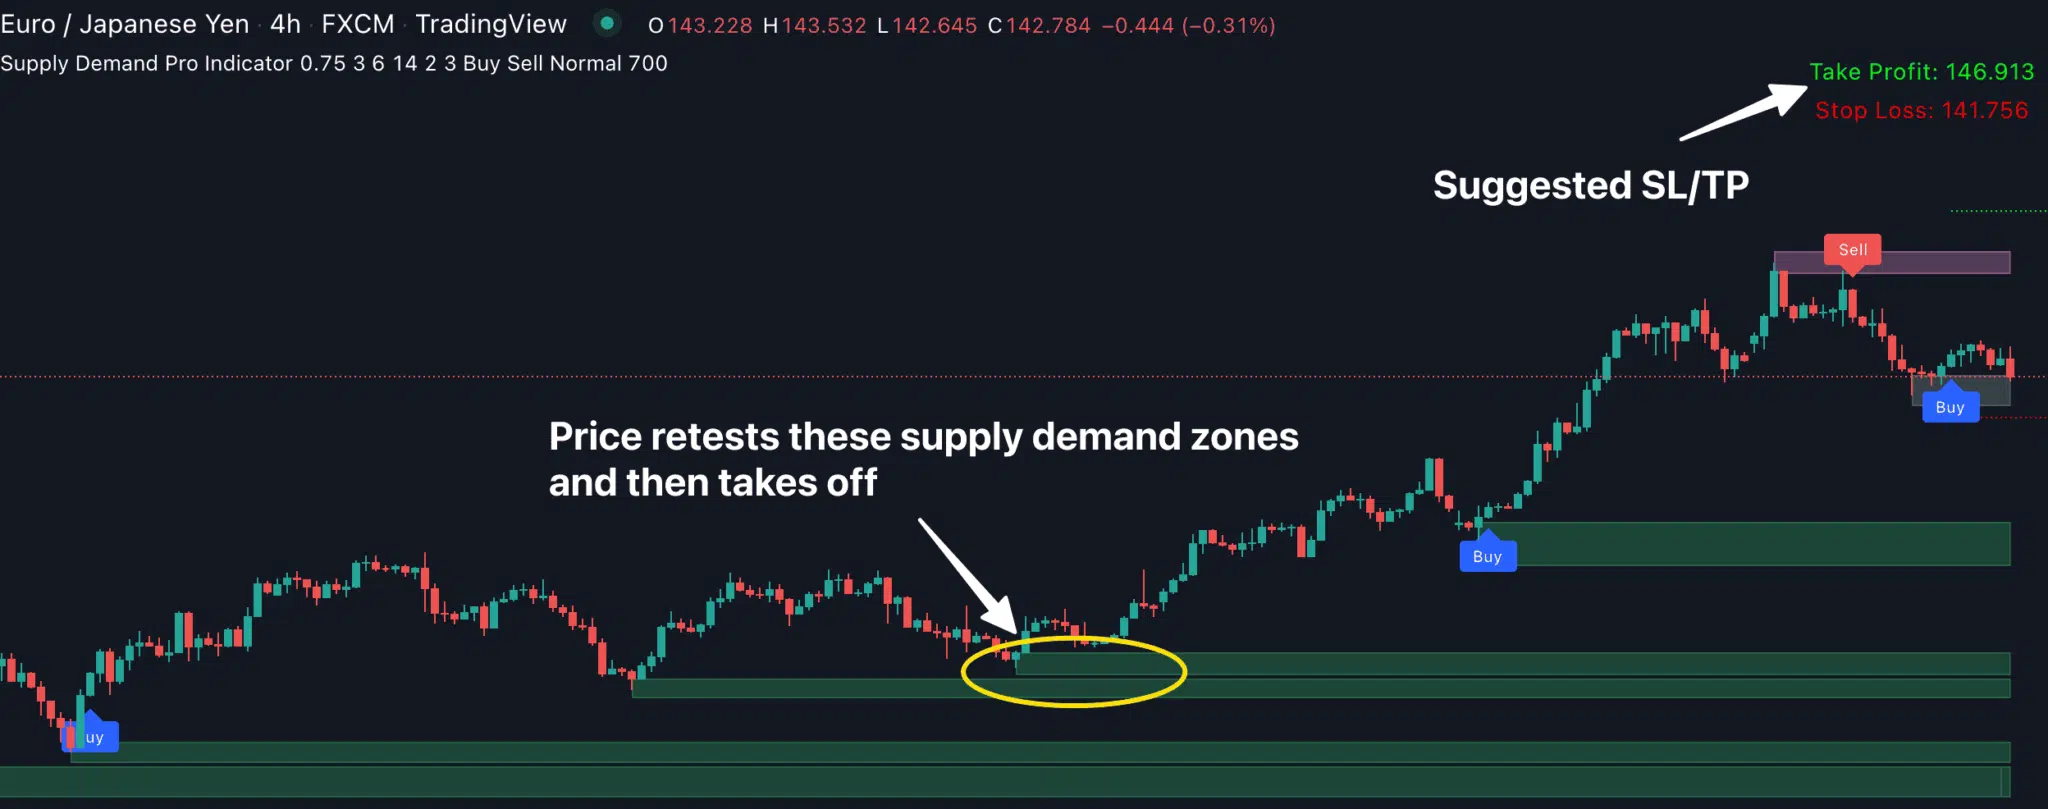
So, supply demand zones are obviously great for reversal trading (which offers an amazing reward:risk ratio). But here’s the problem: It was extremely difficult and time-consuming to MANUALLY draw accurate supply demand zones.
Until now… Introducing: Supply Demand Pro for Tradingview indicator.
Supply Demand Pro for Tradingview identifies all the STRONGEST supply demand zones for you.
And it displays all these zones beautifully on your chart.
So you can see all the newly formed trade setups (based on these supply demand zones) with just one glance at the chart.
A pleasant, stress-free (and hopefully profitable) way to trade using supply demand.
Think I’m exaggerating?
Click here to check it yourself. And thank me later.
6. The bottom line
Supply and demand trading may be seen as a technique for determining the zones in which to initiate deals. While important price levels indicate support and resistance, a larger price area/zone defines supply and demand.
So, in addition to basic knowledge, you should prepare yourself with other support tools that act as excellent assistants, guiding you to the best decisions.
What do you think? Please feel free to share your comments!
Find this article useful? Share this blog with your friends on social media!